Showing posts with label DIY. Show all posts

Sunday, 23 August 2015

Tamiya TBLE-02S mod for LiPo cut-off

In 2014 Tamiya changed their kit ESC to the TBLE-02S model. The speed controller features a low-voltage cut-off function, but it is set to 4.9V -- much too low for LiPo batteries that most RC enthusiasts use nowadays.

However, by adding a single resistor we can modify the cut-off voltage to a LiPo-safe 6.0V or 6.3V.


(Click on image to enlarge)

Sunday, 7 June 2015

Bed-mobile - 3D printed RC bed on TT02 chassis

The LANE Boys recently acquired a 3D printer. Beside printing spare parts and accessories, why not print a body shell?

A few years ago we were amused by the motorized furniture creations of Edd China. So we decided to build this:

P1090456

Saturday, 21 March 2015

Tamiya M01 3D printed battery holder

Last year we bought second hand Tamiya M01 and M02 cars. Both cars were in excellent condition. However, on both car the plate that secures the battery was missing.

Thursday, 19 March 2015

Starting on 3D printed light buckets for RC cars

After long consideration, the LANE Boys finally got a 3D printer. One of the applications we had in mind is printing custom light buckets for RC cars. The first results are very promising.

Sunday, 28 December 2014

Build your own RC receiver

Its always fun learning something new. Ever since we got a 2.4 GHz RC system a few years ago, I wanted to understand how these things actually work. How do they send data over the air? What components are used?
Well, in the last months we finally got around digging into it. And it turned out that it is a rather simple affair. So we built our own RC receivers.

RX DIY with HKR3000 and XR3100
The HobbyKing HKR3000 and XR3100 receivers along with two different versions of compatible, home-brew receivers.

Wednesday, 20 August 2014

DIY RC Light Controller with WS2812B

In recent years LEDs are appearing on the market that contain a controller chip. Currently the WS2812B is highly popular. It is a RGB LED that contains a simple chip inside. The LED is controlled through a single pin using a serial shift-register-like protocol. Multiple LEDs can be chained together; like a Christmas light.

P1070842
The WS2812B LED on a breakout-board for convenient mounting.
The WS2812B is an RGB LED with a built-in shift register like controller. It has 4 pins: GND, Vdd, Data-in and Data-out. With only three wires going from LED to LED, one can control each LEDs color and brigtness individually.

Using such LEDs makes wiring up a vehicle very easy: one only needs to run 3 wires from one LED to the next.

Friday, 9 May 2014

Shorten your servo wires

Most servos and speed controllers come with a wire that is too long for the average RC car. The usual way to deal with this is to either make a spiral by tightly wrapping the wire around a pencil, or by carefully bundling the wire up and securing it with a zip-tie.

A better way, albeit requiring more effort, is to shorten the servo wire to the exact length needed. The unused length of wire is just ballast, and also restricts current flow.

This post shows you how to shorten servo wires.

Saturday, 24 August 2013

Tamiya TEU-104BK mod for LiPo cut-off

Many Tamiya kits available on sale today still come with the TEU-104BK ESC. This ESC is perfectly fine for running brushed motors, but does not contain a BEC and its low voltage cut-off is too low for LiPo batteries.

The missing BEC is easily dealt with: either use "high voltage" compatible servo and receiver, or a cheap external BEC.

Fortunately it is also easy to modify the ESC to have a LiPo compatible voltage cut-off -- assuming you are able to solder a tiny surface-mount resistor.

Saturday, 9 March 2013

Custom jumpsuit for a scale RC driver figure

Our Tamiya XR311 is getting close to being finished. One of the last remaining jobs is painting the driver figure that comes with the kit.

Since I made the steering wheel in the XR311 movable I need the arms of the driver to follow the steering wheel. I first thought of adding hinges to the plastic, but abandoned the idea. I made hinges before for our Dingo and I am not pleased with how it turned out.

Studying how others solved the issue I found that real cloth provides the flexibility to keep the hands on the steering wheel. So I needed to make a suit for my driver.

Tamiya XR311 P1270028

Monday, 11 February 2013

2.4 GHz receiver antenna repair

Notice something missing?

RX FS-GR3C case

Yes, the antenna has been cleanly ripped out of this poor receiver. Time to get out the soldering iron...

Thursday, 7 February 2013

HobbyKing HK-310 throttle return mechanism repair

Can you spot the problem with the throttle trigger in the following picture?

If you look carefully, you can see that the throttle trigger on the right transmitter is slightly depressed towards the grip. This is due to a fault in the mechanism that returns the throttle trigger to the centre when you release it.

Fortunately it is not difficult to fix this issue.

Wednesday, 30 January 2013

DIY RC Light controller pre-processor miniaturization

This blog post is a follow-up on "Pre-processor for the DIY RC Light controller"

It did not take long until it became necessary to shrink down the pre-processor for my DIY light controller.

P1260534

The HobbyKing HK-GT2R receiver is significantly smaller than the HKR3000 the LANE Boys are using, especially in height. No way an old-fashioned micro-controller in a DIP (Dual Inline Plastic) package can fit in there!

We need to solve this...

Tuesday, 25 December 2012

Pre-processor for the DIY RC Light controller

For my Tamiya XR311 I needed one of my DIY RC Light Controllers. If you are not familiar with it, please refer to my blog post: DIY car light controller for 3-channel RC

The XR311 is a small car and does not have any lights attached to the chassis, only to the body. So there was no need to have a full blown light controller on the chassis like in our Dingo, but I still wanted the convenience of having only a single servo extension wire between the chassis and body.

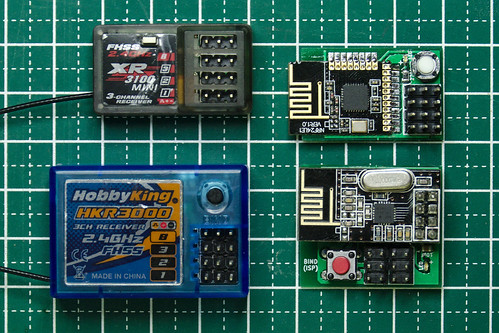
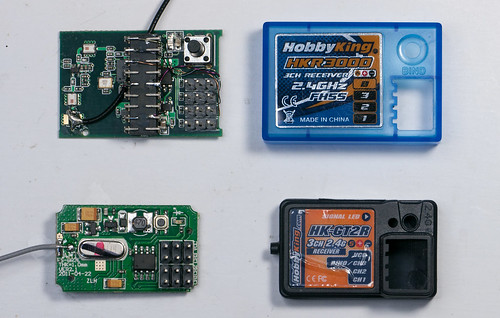
The HobbyKing HK-310 radio system I am using does unfortunately not have a PPM output on the signal pin of the battery connector as some receivers do, so this route was out of the question.

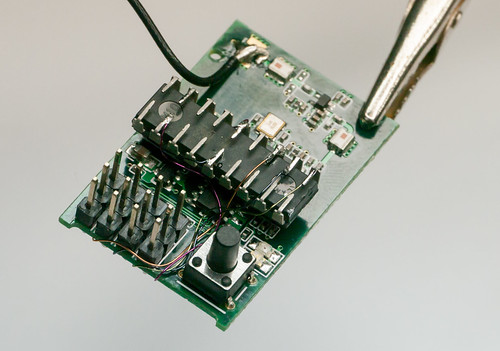
So I came up with the following solution: use a stripped down light controller in the chassis, serving as kind of pre-processor for the steering, throttle and Channel 3 signals. Since only one chip is needed for this function, why not add it directly into the receiver?

P1260091

Monday, 30 July 2012

DIY car light controller for 3-channel RC

Light systems for RC cars are available for relatively little money. But for our Dingo I wanted something custom, something special. So I made my own.

The goal was to be able to control the lights from a simple 3-channel RC car radio controller, such as the HobbyKing HK-310 or the FlySky GT3B -- both of which we own.

The following functions have been implemented:

  • Parking, Low-beam, Fog lamps and High-beam can be switched on/off using CH3
  • Brake and Reverse lights are automatically controlled by monitoring the throttle channel
  • Indicators only come on when you want to. You have to stay in neutral for 1 seconds, then hold the steering left/right for one second before they engage. This way normal driving does not trigger the indicators for more realism.
  • Hazard lights can be switched on/off using CH3
  • Programmable servo output designed to drive a steering wheel or a figures head

This video shows the functionality of the light controller:

Thursday, 5 July 2012

A new face for our Axial SCX10 Dingo

Since we joined the SG Crawlers on their trails the small Tiger Crawler didn't cut it anymore. So we bought an Axial SCX10 Dingo.

One thing that turned us off when we first saw the Dingo was the front area. The stickers of the grill and lights just looked wrong. That was definitely an area we needed to improve on ours.

01-individual-parts

Monday, 4 June 2012

Tiger Crawler rear axle repair

Our Tiger Crawler from Thunder Tiger has seen a lot of use lately. And it developed a few problems on the rear axle. With a bit of DIY, some scrap material and a fresh set of gears we got it running again in no time.

10-bracket-installed

Wednesday, 16 May 2012

DIY temperature sensor for 4-button RC battery chargers

Most 4-button chargers on the market appear to have a connector for a temperature probe. Unfortunately almost none of the chargers come with the sensor in the box, and even aftermarket availability of temperature probes is non-existent. With a little bit of DIY you can easily build one yourself though.

1-charger-battery-sensor